Category Archives: Craft

Hama Bead Woodland Kit

Whenever I need a peaceful, calming activity I tend to turn to Hama beads.  There’s something about them that attracts all the children, including any visitors, at once and keeps their attention for a very long time.

hama beads 1

We’ve got plenty of Hama beads and boards really, but you can never have too many, and the children are always inspired by a new kit.  They were very excited to receive this lovely Woodland Kit, and a selection of extra boards, from Craft Merrily last week, and couldn’t wait to dive into it.

hama beads 2

The big boys made the owl and the squirrel from the Woodland Kit, and I was really impressed by their concentration as they were quite fiddly designs.  I loved the results too.

hama beads 3

The little ones had fun with the extra boards, and produced a slightly scary rabbit and an extremely colourful flower!

hama beads 4

We really enjoyed having some new Hama bead inspiration, and I think we’ll be doing a lot more over the next few weeks.  I hope to share some Christmas Hama designs here soon, though I expect there will be quite a few random ones too!

We received the Woodland Kit and a selection of boards free for the purpose of this review.

Daffodils for Freddie

Dear Merry,

It’s been a while since we have done any organised art and craft together.  The “doodle drawers” are emptied on a daily basis, and as far as the little ones are concerned, “making time” is all the time, but I haven’t had it in me to plan any activities for them recently.  They have, of course, been perfectly happy independently creating and mess-making, but I have missed doing it with them.  It has taken your daffodil boy to give me the motivation to get on with it, and I am thankful for that.  A little bit of art therapy proved to be exactly what I needed.

daffodils 1

And now, our Spring display is up.  It is the first thing I will see every morning when I come downstairs, and when I come in from outside too.  And if I needed a reminder, which I don’t really, it will make me think about Freddie every day.

daffodils 2

Merry, I will never forget your beautiful boy.  Sending you all my love for April and always xxx

Hobbycraft Christmas Decoration Kits

We have been sent two Christmas Decoration craft kits to review by Hobbycraft, and my original plan was to let the children try and help me.  On closer inspection, I decided it was probably a bit too difficult, or at least it would have taken them even longer than it took me.  So I decided to make them myself, and perhaps we will make some more later with our stash of felt.  (It is tempting to say that they were made by the children, but the slapdash sewing is all mine!)

hobbycraft decorations 1

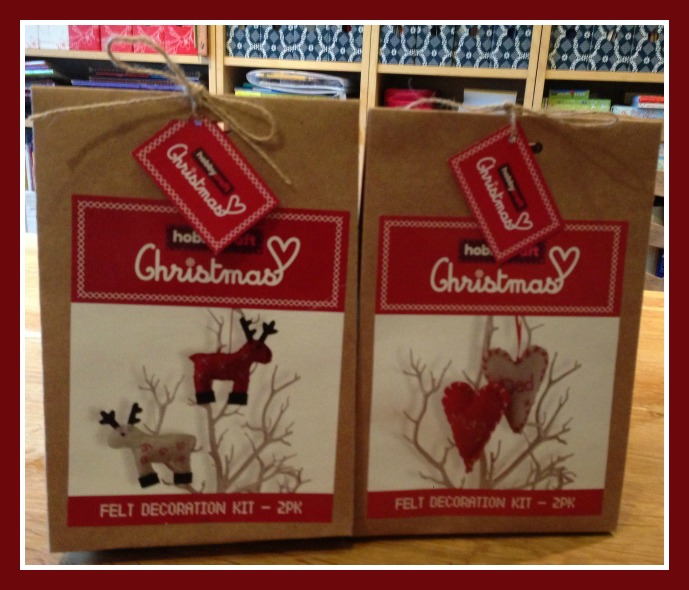
We chose the reindeer and the heart decoration kits, and it was interesting to compare the two.  The reindeer kit, which I did first, was harder, and in fact the children would have been able to do the hearts, so that is probably something we will try if we make our own.

hobbycraft decorations 2

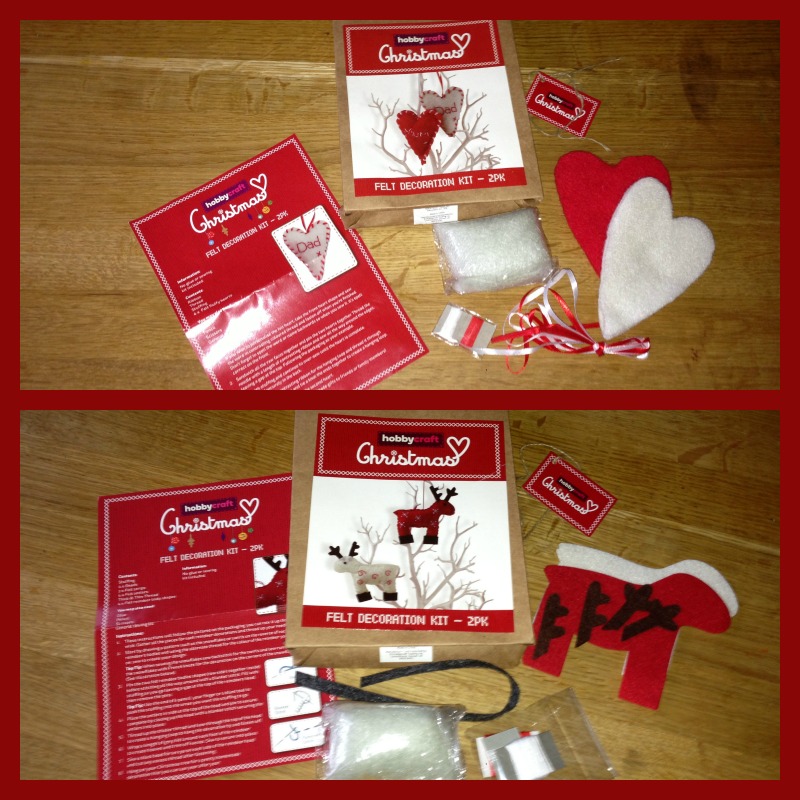
The kits are priced at £3.00 each and include pre-cut felt pieces, thread and toy stuffing.  The reindeer kit also has beads for eyes.  Both kits contain an instruction leaflet.

hobbycraft decorations 3

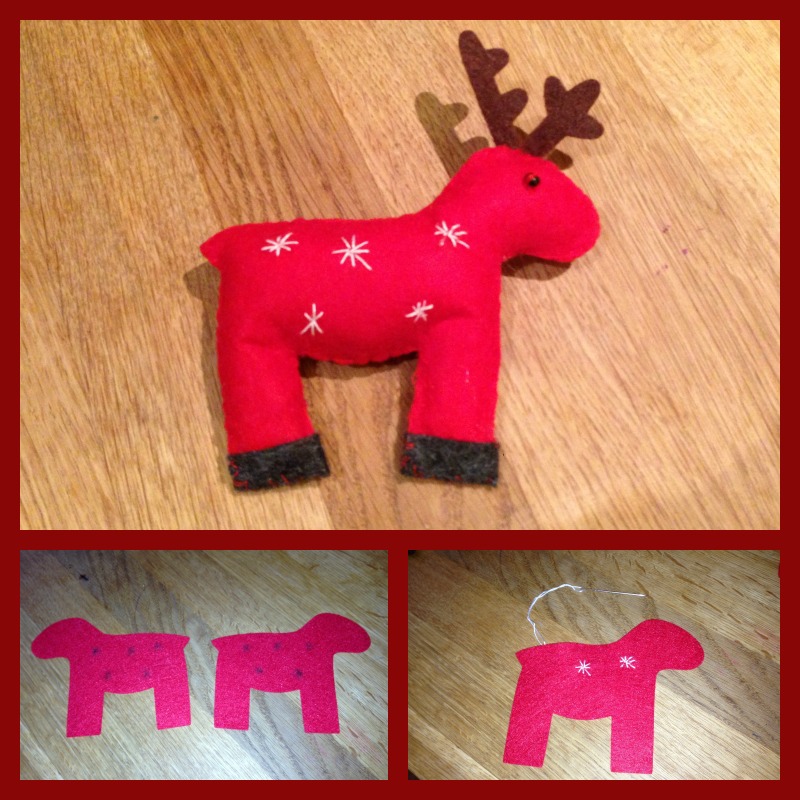
I started by marking the snowflake patterns on both sides of the reindeer.  It wasn’t clear from the instructions which thread to use, as there was a small amount of embroidery thread and a larger amount of thin sewing thread.  I opted for the embroidery thread, which seemed the logical choice, but it turned out to be the wrong one as there was only enough for four snowflakes on one side.  I used the thin thread to complete the last snowflake and decided to keep the other side plain!

The instructions included small pictures of the stitches needed – back stitch, blanket stitch and running stitch.  However, I don’t think you would be able to work out how to do all the stitches from the pictures if you didn’t already know.  I had to think hard about how to do blanket stitch – I did eventually remember, though I did it pretty badly.  The instructions also refer to using French knots for decorations on the corner of the snowflakes, but I couldn’t remember how to do them so I missed them out.

Having joined the two pieces with blanket stitch, I filled the reindeer with the toy stuffing, added the antlers and sewed up the hole at the top.  Then I added the beads for the reindeer’s eyes, and felt pieces for the feet.  I have not yet added hanging loops, as they were supposed to be made with the embroidery thread which I used by mistake, so I will have to find some more thread and add them later.

hobbycraft decorations 4

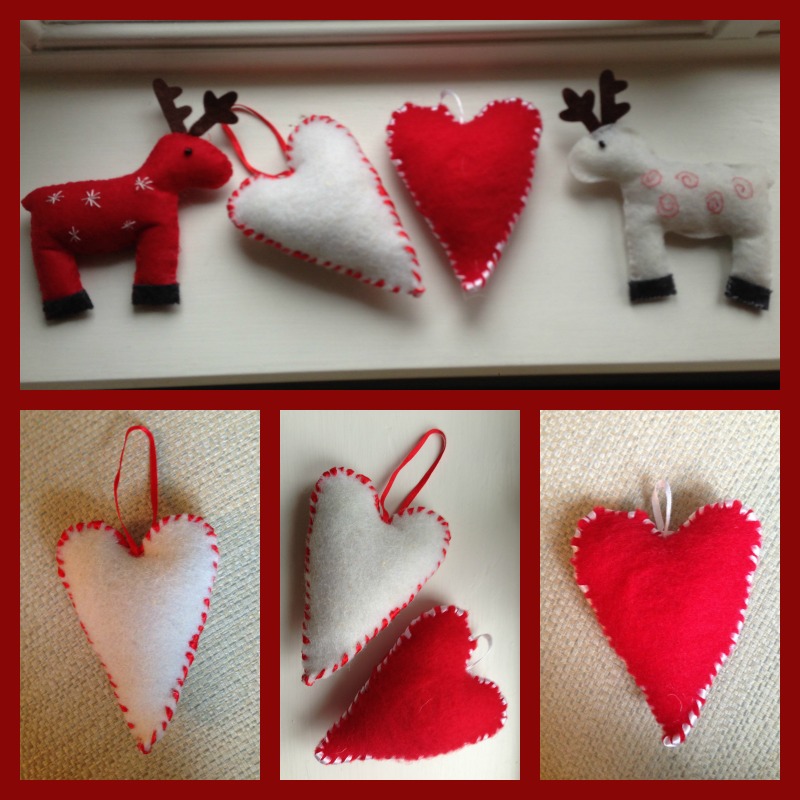
Next, I made the hearts and they were much easier, particularly because I decided not to embroider any words on them.  I didn’t really want “Mum” and “Dad” as suggested, and couldn’t think of anything else to do, so I left them plain.

The felt in this kit is thicker and fluffier, and there are pieces of ribbon to sew them together.  I prefer the look and feel of the thinner felt, but it was very quick and simple to sew the thick felt pieces together with ribbon so this kit would be more suitable for a child or someone who is not very confident about sewing.

It would be useful if there was a slightly larger amount of ribbon provided to allow room for error.  I nearly ran out of white ribbon so the hanging loop on the red heart is too small and I will have to replace it later.

hobbycraft decorations 5

I think the kits represent good value for money at £3.00 each, although they could do with clearer instructions in parts, and a more generous amount of ribbon and embroidery thread.  They reindeer kit would be tricky for a beginner, and both kits would be too basic for someone more experienced.  However, they were just about right for someone like me with rather rusty sewing skills, and I did enjoy doing them.  I also worked out what to do, and what not to do, when I try to make my own decorations so it was useful from that point of view too.  They may not be perfect, but the children love them so I am happy with the results!

This post is sponsored by Hobbycraft.

Little Mouse’s Big Book of Beasts

We have been sent another lovely book to review by Macmillan and this one has inspired us so much that it was hard to know when to write this post as we have more ideas we would like to follow up.  However, we have had the book a while so I thought we should let you know what we think of it, and what we’ve been up to so far.

Little Mouse’s Big Book of Beasts by Emily Gravett is a picture book with a difference.  It is the follow up to the multi-award-winning Little Mouse’s Big Book of Fears which was published in 2007.

Book of Beasts 1a

Little Mouse has found a book about the world’s most terrifying and ferocious beasts, but they are all a bit too scary for him.  So he changes the book to make it less frightening.

Book of Beasts 2 (2)a

He gives the lion some pretty mittens to cover up his sharp claws, and removes his loud roar.

Book of Beasts 2 (3)a

He removes part of the instructions for making an origami shark, and adds his own for making an origami mouse instead.

Book of Beasts 2 (4)a

The rhinoceros is given a selection of dainty shoes.

Book of Beasts 2 (5)a

The jellyfish is crossed out and replaced with a dish of jelly.

Book of Beasts 2 (1)a

And at the end, the mouse is cleverly transformed into a monster using parts he has torn from the previous pages.

When I first shared the book with the little ones (aged three and five) I think they were a bit bemused, and I felt I had to do a lot of explaining.  The older boys (aged seven and nine) liked it immediately, so I thought it might appeal more to this age group despite being a picture book.  However, the younger children did enjoy it and it definitely grew on them.  I liked it because it sparked off so many ideas for activities we could do together.

We talked about how it would be fun to draw our own pictures of animals with a difference and we decided to play heads, bodies and legs (like consequences but with pictures.)

Heads, Bodies and Legs

Then we decided to have a go at some origami.  First we made some origami planes using an excellent kit from Djeco.

Origami Planes

Then Rabbit and I tried out the much more fiddly Safari Origami kit from 4M.  We just about managed the butterflies and birds which are for beginners but quite hard.  We haven’t tried the rest of the animals yet but we will!

Origami Animals 1a

The following day we had another go with the much easier Djeco origami animals kit.

Origami Animals 2a

Next, Owl wants to try following the origami instructions in the book to see if they work.  Will they make a shark or a mouse or something else?!

And we are also planning to draw some animals and then change them in the way the Little Mouse has done.  That should suit all the children, as the older ones love drawing and the little ones love cutting and sticking!

So what else would you do?  Any more ideas gratefully received.  I have a feeling that this book is going to be keeping us busy for a while!

The book was given to us free to review.  The origami kits were our own but I have linked to Craft Merrily because that is where I would go to buy Djeco products.

Easter crafts and an egg hunt

This weekend we are staying at Granny and Grandpa’s again.  We arrived on Friday evening, and before we were even out of bed yesterday morning the children were talking about the Easter crafts they would like to do.  Rabbit and daddy started the day by reusing a Christmas decoration to make an Easter garland.  It is a silver chain with stars on, and they drew, decorated and cut out lots of Easter eggs to stick on the chain, alternating with the stars.  Owl, Monkey, Tiddler and I also decorated one egg each, but daddy did quite a few and Rabbit did the most.  While they were doing this, Monkey made a bunny basket (an idea which we have used before, from our Usborne book of Easter things to do.)  He did it fairly independently, with just a little help from daddy, and I was so impressed that I went to the village shop and bought some sweeties to put in it!

In the afternoon, we went to the church for some more craft activities and an egg hunt.  The children decided to start with the egg hunt, and got plenty of fresh air running round the church yard looking for printed eggs with a letter on.  They had to write down the letter and unscramble them to find something we eat at Easter.  The big boys did theirs independently, and daddy helped Tiddler while I helped Rabbit.  I was very proud of her efforts writing all the letters herself, and then writing the answer (hot cross bun). We then went inside the church, and the children had a wonderful time making daffodil windmills, Easter baskets, scratch art eggs, Easter bonnets and decorated foam eggs with magnets on the back.

Later in the afternoon, I made chocolate nests with Rabbit and Tiddler (much better than the ones we made on Wednesday, mainly because we had enough chocolate this time.) After that I tried dyeing hard boiled eggs with all the children.  I got them to stick stickers on (shiny ones so they wouldn’t soak off in the water – well that was the idea) and draw on them with wax crayons, before placing them in a bowl of water mixed with lots of food colouring.  It wasn’t particularly successful because most of the stickers came off, though some stayed on better than others.  So if we try it again, I will get a wider range of stickers to see which ones work best.  Also, despite using about a third of a bottle of food colouring, the dye wasn’t really strong enough.  I think we will just have to revert to our usual method of drawing on them with felt pen, and maybe try again with the dyeing next year.

Anyway, overall it was a succesful happy crafty day, and we are all having lots of fun.  Hope you are too.  Happy Easter!

Egg box daffodils

We made some egg box daffodils yesterday for our Spring display.

Here’s how to do it.  You will need:

  • An egg box (we used one with twelve sections which was about right for four children.)
  • Some old cereal boxes.
  • Yellow paint, paintbrushes.
  • Scissors, stapler, double-sided tape or PVA glue, normal tape.
  • Green paper (for the stems, if they are for a display.  If you want them to stand up you could use sticks, straws or pipe cleaners.)

Cut the bottom of the egg box into sections, and trim round each one to neaten it as much as possible, but don’t worry too much if they are a little rough around the edges.  Cut petal shapes out of an old cereal box.  You need six for each daffodil.  Paint everything yellow!

When they are dry, arrange 6 petals in the shape of a flower head and staple them at the centre.

Use double sided tape or PVA glue to stick the egg box trumpet to the flower head.

Tape a strip of green paper to the back of the flower head.

These are the finished daffodils, along with our daffodil drawings, on our spring display.

While I was thinking about doing this activity nearly a week ago, I saw a blog post which reminded me to get on with it.  So if you’d like to try another (more detailed) version, have a look here.

How to make a teepee

This post is written by Monkey.

Teepee 1

Today I made a teepee with Granny.  This is how you do it.

You will need:

3 chopsticks

sellotape

string

wrapping paper

scissors

How to make it

  1. First, hold one chopstick diagonally, then put another one diagonally across it.  Then cut some string and tie them together, leaving some string dangling.
  2. Place the third chopstick diagonally in between the two top bits of the other ones. Using the end of the string, tie it to the other ones.  Make sure it can stand up, looking like a bonfire, then tape over the string at the top to secure it.
  3. Next, cut a piece of wrapping paper big enough to go over the frame.  Then cut a long line in the paper so that you can wrap it round.
  4. Tape it in position, and a cut a shorter line for a door.  Then your teepee is done.

Teepee 2  Teepee 3

Hama heaven and the MP who came to tea

I recently ordered some more Hama beads and they arrived before we went away last week, but we didn’t have time to do it until we got back on Friday.  When I opened the parcel, the children were in Hama heaven, and it kept them quiet for about an hour.

  When I placed the order, I thought it would be enough to last a while, but they already have a list of certain colours they need, so I expect we’ll be back to order more soon.  It was a very peaceful way to spend an afternoon and it occupied the children very well while we talked to our MP (Tom Brake) who came to visit us.  We talked about my Select Committee appearance, and the issues around support for home education.  Owl then asked him how he was going to save our local hospital, and he explained about the campaign he is running.  We also talked about his role as Deputy Leader of the House of Commons and what that involves.  It was an interesting afternoon and a lot of learning went on (not just the children!)  The Hama beads kept the peace throughout the conversation, and I was very pleased with the results.
  Rabbit made the Maxi bead square by herself and then the butterfly with a lot of help from Supergirl and me.  Monkey made the house, the crossed arrow heads and the heart, and Owl made the pine tree with pine cones.  They had so many other ideas that they didn’t have time to complete, so I think they will use the beads as fast as I can buy them.  It looks like they will be on the Christmas lists this year.

More Hama Bead Fun

Rabbit has been unwell again for the last couple of days and mainly sleeping or watching CBeebies, but yesterday afternoon she was feeling better and wanted something to do.  I gave her a set of Midi Hama Beads and she spent a long time making a lovely picture with them, but it wasn’t suitable for ironing as there were lots of spaces between the beads.  She then decided to follow one of the pictures that came with the set, and made this boy (with a little help from me and a lot of help from Supergirl.)

To occupy Tiddler while Rabbit was using the Midi Beads, I got out the leftover Maxi beads from the dinosaur and butterfly kits.  He had fun for a while putting random beads on the dinosaur template, and when he had finished Owl and Monkey made these smiley faces.

I love finding craft activities that all four children can enjoy, and I would like to have a go too, so I am going to order some more soon.  Here are some links for where to buy them and some ideas for what to do with them.

http://www.craftmerrily.co.uk/section/15/1/hama-beads

http://www.beadmerrily.co.uk

http://www.patchofpuddles.co.uk/archives/category/art-craft-books/hama-beads

http://pinterest.com/merrilyme/hama-beads/

http://www.simplecrafts.co.uk/category/by-craft/hama-beads/

Lavender and pompoms among other things

We are all still at various stages of illness and recovery, so we are having a quiet week.  Yesterday, Suburban dad stayed at home and tried to rest a bit, get some work done and help with the children as much as he could, so we muddled through the day.  In the morning, the two little ones still seemed to be quite unwell, and Rabbit fell asleep on the sofa soon after she got up.  However, they both felt better after a little while and had a lovely time playing games with Supergirl (Scrabble and Marble Run and probably others as well, I can’t remember.)  The big boys did some Maths and English, and played some Science games online.  Owl played a BBC Schools game about Rocks which I suggested, and Monkey chose a game on BBC Bitesize.

Then I decided on a whim that it was time to do something with the lavender we picked in July.  Last weekend it got moved to the hall when we were clearing out the Laundry room, and when I was tidying the hall yesterday I thought I should probably stop moving it from room to room and just use it instead.  So I started stripping the lavender with the children and Supergirl came to help.  Then the children wandered off and Supergirl and I finished the job.  It was quite therapeutic.


Owl, Monkey and Tiddler made lavender bags, but Tiddler was not quite well enough to manage it, so he had a daddy cuddle instead.  Maybe he can make one another day – there is plenty of lavender left.

In the afternoon, Monkey and I went with Supergirl to the local college so she could take a test and register for an EFL course.  When we came back, the big boys did their Music practice, I did some knitting with Rabbit, and all three did Mathletics, Spellodrome and Bible reading.  As promised, I made a pompom with Tiddler.

Monkey went to Beavers, and then I went out to my exercise class, thinking the children would be in bed by the time I got back, but they had been having far too much fun making chutney with daddy instead!


Today, we were all feeling a bit worse again, with more sickness from some of the children and also Supergirl in the night.  So we had a quiet pottering around kind of day, trying not to be too noisy (and probably failing) as Supergirl tried to get some rest upstairs.  The big three did Reading Eggs, and then I did some knitting with Rabbit.  The big boys went upstairs to play with Lego and Tiddler did some puzzles, while I read a story to Rabbit from an old Octonauts magazine and then helped her to make a Snot Sea Cucumber and two Anemones.  She is very proud of them!


In the afternoon, they all did some BBC Bitesize Science games together, and then the younger three watched CBeebies, while Owl read Maths for Martians: Galaxy Getaway.
Then Owl wrote his blogpost and the other three disappeared upstairs.  Rabbit came down after a while and asked for some coins as they were playing fairies.  I was a bit confused but made her some coins out of paper, which seemed quicker at that point than finding some, and also not a choking hazard.  It turns out that Rabbit was the tooth fairy and Monkey and Tiddler were in bed.  It was a nice quiet game!  After that we all started to make some more pompoms, to be continued tomorrow.